A chronicle of the meanderings, false starts (which in retrospect, while sort of embarrassing turned out to be highly instructive), epiphanies, selective apathy (still evolving), wild mood swings, opinions (subject to frequent change), and life lessons of an inveterate dabbler (and her latest dabblings).

Friday, June 22, 2012

Bohemian Inspired Jewelry Celebration!


I'm delighted to be part of the blog-party kickoff for Lorelei and Erin's book, Bohemian-Inspired Jewelry! I pre-purchased this little gem on Amazon ages ago, the moment I heard it was coming out, and couldn't wait to get it! I wasn't disappointed--it's gorgeous (really stunning photography), inspiring, and helpful! I've been an admirer of both Erin and Lorelei's work for a long time--I love knotted pieces, and unusual construction techniques, which both these ladies are virtuosos with! Perusing their designs has continually helped me think outside the box with my own work.

When I got the book, I was also thrilled to discover additional contributions by other crazy-talented artists too--Mary Jane Dodd, Denise Yezbak Moore, and Tracy Statler. I wasn't familiar with Denise's and Tracy's work before, so I am tickled to find new artists to add to my favorites list!

The book includes some really helpful features: a supplies list especially helpful for knotting and working with fibers; a section on knotting, stringing and wirework skills that are used throughout the rest of the projects, with some great illustrations (the drawings are super easy to understand); and references in each project to the skills you will need to refer to as you work, with the page number they're on. This makes it streamlined and easy to use. Many of the knotting techniques I wanted to learn are included, which I was so excited about! (And they're not nearly as complicated as I had thought...) The instructions for each project are comprehensive, very detailed, and thoughtfully written.

As I suspected, I am already brimming with new ideas for my own work....I've wanted to make a lariat style necklace for a long time, and this makes me desperately want to do it RIGHT NOW:

And now I MUST have velvet ribbon too. I really wanted to do up a lariat for this post but I just haven't had time...

Of course I would wear this with a plunging neckline, perhaps with something like this:
Via Polyvore
To one of the many, many ultra-posh parties I attend on at least a weekly basis.
In my mind.

So if you're in the market for out-of-the-box jewelry inspiration, ideas for using fiber in your pieces, and some absolutely essential knotting skills for your skill toolbox, this book will be a great investment!

Saturday, June 16, 2012

I'm Still Doing the Coin Dance

Fajitas in Trafalgar Square
This is Coin Bracelet No. 2. These coins were colored mostly with Vintaj opaque patina inks (I got these from Melinda Orr)--I was trying sort of a dry brush technique, like you would use for stenciling. I think the coins themselves are perhaps brass and copper--I sanded the edges a bit and this is what seemed to show through. I don't know what the coins are. The materials in this one are similar to the last--Czech glass, and some copper openwork tube beads treated with traditional verdigris patina from MissFickleMedia (they're sealed with Permalac). This one is heavier on the turquoise/azure/sea green than the last one. The copper charm on this one was textured with a 1967 British six pence coin and a 1947 British halfpenny (the "ship" halfpenny coin). You can't really see it in these pictures but the halfpenny, on the "tails" side, is imprinted with the image of a gorgeous multi-masted sailing ship--I just love it! (I read on Wikipedia this ship is thought to represent Sir Francis Drake's Golden Hind ship.) You can see it a little bit in the picture below. (I got most of these coins from Joel Anderson.)


Some of the coins are just lovely, but I didn't think the design on them had enough relief to use with a hammer, so I thought I would use them in a clasp as-is, without patina. I thought these were especially nice:

A couple of these are modern coins--the two larger ones from Costa Rica and Mexico. I'm in love with the Costa Rican one! You can't really see the glimmer very well in this photo, but it's a lovely warm brass. The other two coins fascinate me--the copper one at the top right is a Palestinian coin from 1927 (!), and the smaller brass one at the bottom right is a 1924 German "Rentenpfennig" (the Rentenmark was a currency issued in 1923 to stop the hyperinflation in Germany, and this is a ten cent piece--again with the Art Deco! The other side has some beautiful, stylized wheat stalks on it). Little pieces of history....I will certainly use the two larger, modern coins, but I don't think I'll use the other two. They're too interesting!

These are also quite nice--I assume they're some sort of nickel alloy, probably nickel and copper. I pickled them and then scrubbed them with a brass brush and some dish soap to get the grime off--I hated doing that because of how nicely oxidized they were, but the idea of decades of grubby fingers on them kind of grossed me out. I tried to re-antique them a bit with some nickel oxidizer.

I just love that 1946 15 kopek coin (from the former USSR!), it's so Art Deco looking! And I love the little honey bee on the Norwegian coin at the bottom right! The coin just to the left of that is a Colombian ten cent piece featuring the portrait of Indio Chief Calarca--it's just lovely! The other coins, from the left of that and around clockwise are from Zimbabwe, Portugal, Spain and Indonesia. The older coins have some modest value to collectors ($5 here, $10 there), but I just love them because they're beautiful.

Tomorrow I hope to try some other colors of patina and some bracelets in different color schemes (I'm thinking maybe something in reds, oranges and purples with some brass...)

Sunday, June 10, 2012

New Life for Old Coins

I mentioned in my last post that I had just bought some coins from Joel Anderson Interesting World Coins and Paper Money--I got a whole pound of them! They're from pretty much everywhere. I pulled out the ones with the nicest textures to use on my metal, and left the rest in the bag. What to do with them...?

About five of them were very worn down and blackened with oxidation, so I decided to use them for patina experiments. I didn't even know what kind of metal they were! Well, they all took the verdigris to some extent (the coins in this post were treated with traditional verdigris solution from Shannon LeVart (MissFickleMedia), and then sealed with Vintaj/Ranger sealant and Renaissance Wax). I used one of the smaller ones in a pendant (see my last post), and saved out four for use as bracelet clasps (I REALLY need to make some bracelets for the shop). I had an idea for possibly stacking them to make a toggle clasp:

I used my little hole punch from Fire Mountain to make holes in the smaller coins, and my drill to make holes in the larger (they're too big for the punch). Then I turned them into toggle clasps with a rivet and copper sheet and wire.

I decided on a Southwest kind of color palette, because I just can't stay away from that when I have something turquoise! I had just gotten some FABULOUS Czech beads from CraftAnne and BeadsAndBabble on Etsy, and they seemed just perfect.

This was how it came together:
More Hong Kong-Santa Fe Fusion
I also included poppy jasper in an interesting shape, Indonesian glass beads from Happy Mango Beads, and some "cocoon" beads (based on a tutorial by Kharisma Ryantori) I had made from copper and antiqued with Shannon's verdigris solution. I am in LOVE with the multicolor Czech picasso beads (I might have to clean out CraftAnne's shop of these!)--they're the larger ones with the beadcaps on them.

When it was mostly completed I added few tchochkes: a Czech glass wheel bead in turquoise, one of my new round charms (textured on one side with a 1963 Hong Kong fifty-cent piece and on the other side with a Thai coin I can't identify-- I'm guessing it's from the 50s or 60s too), and a couple of textured copper bowls to sort of camouflage where the strands join the toggle loops (this is beaded with SoftFlex beading wire).

Here's a view of the other side of my round charm:

I'm digging these Asian coin textures.

This item is sold, and on its way to the East Coast today!

Wednesday, June 6, 2012

March of the Bails (Gawd, Will it Never End?)

Sigh. More pendant bails. This is the downside of experimentation--you kluge it as you go and you can never get it together all at the same time. I never quite know where I'm going with anything, and I change my mind a gazillion times. I imagine that's the way it is with most of us creative types! ("I like to let the jewelry make itself. But when I come back after cocktail hour, it isn't done yet and I end up having to make it myself.")

This one finally came together over the weekend.
Cherry Bomb
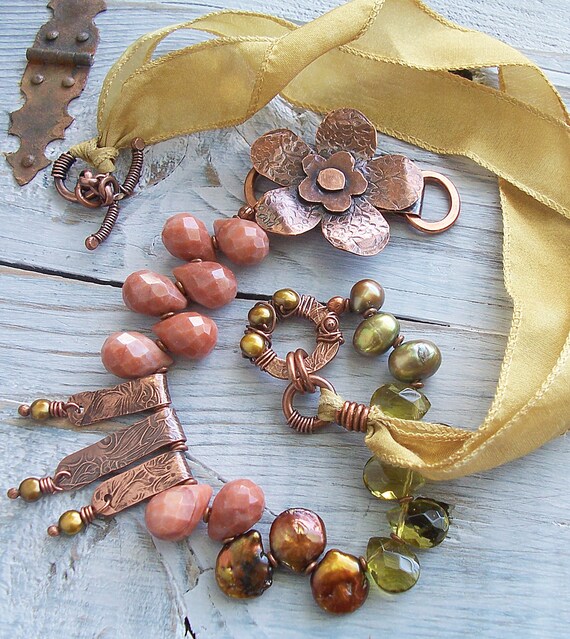
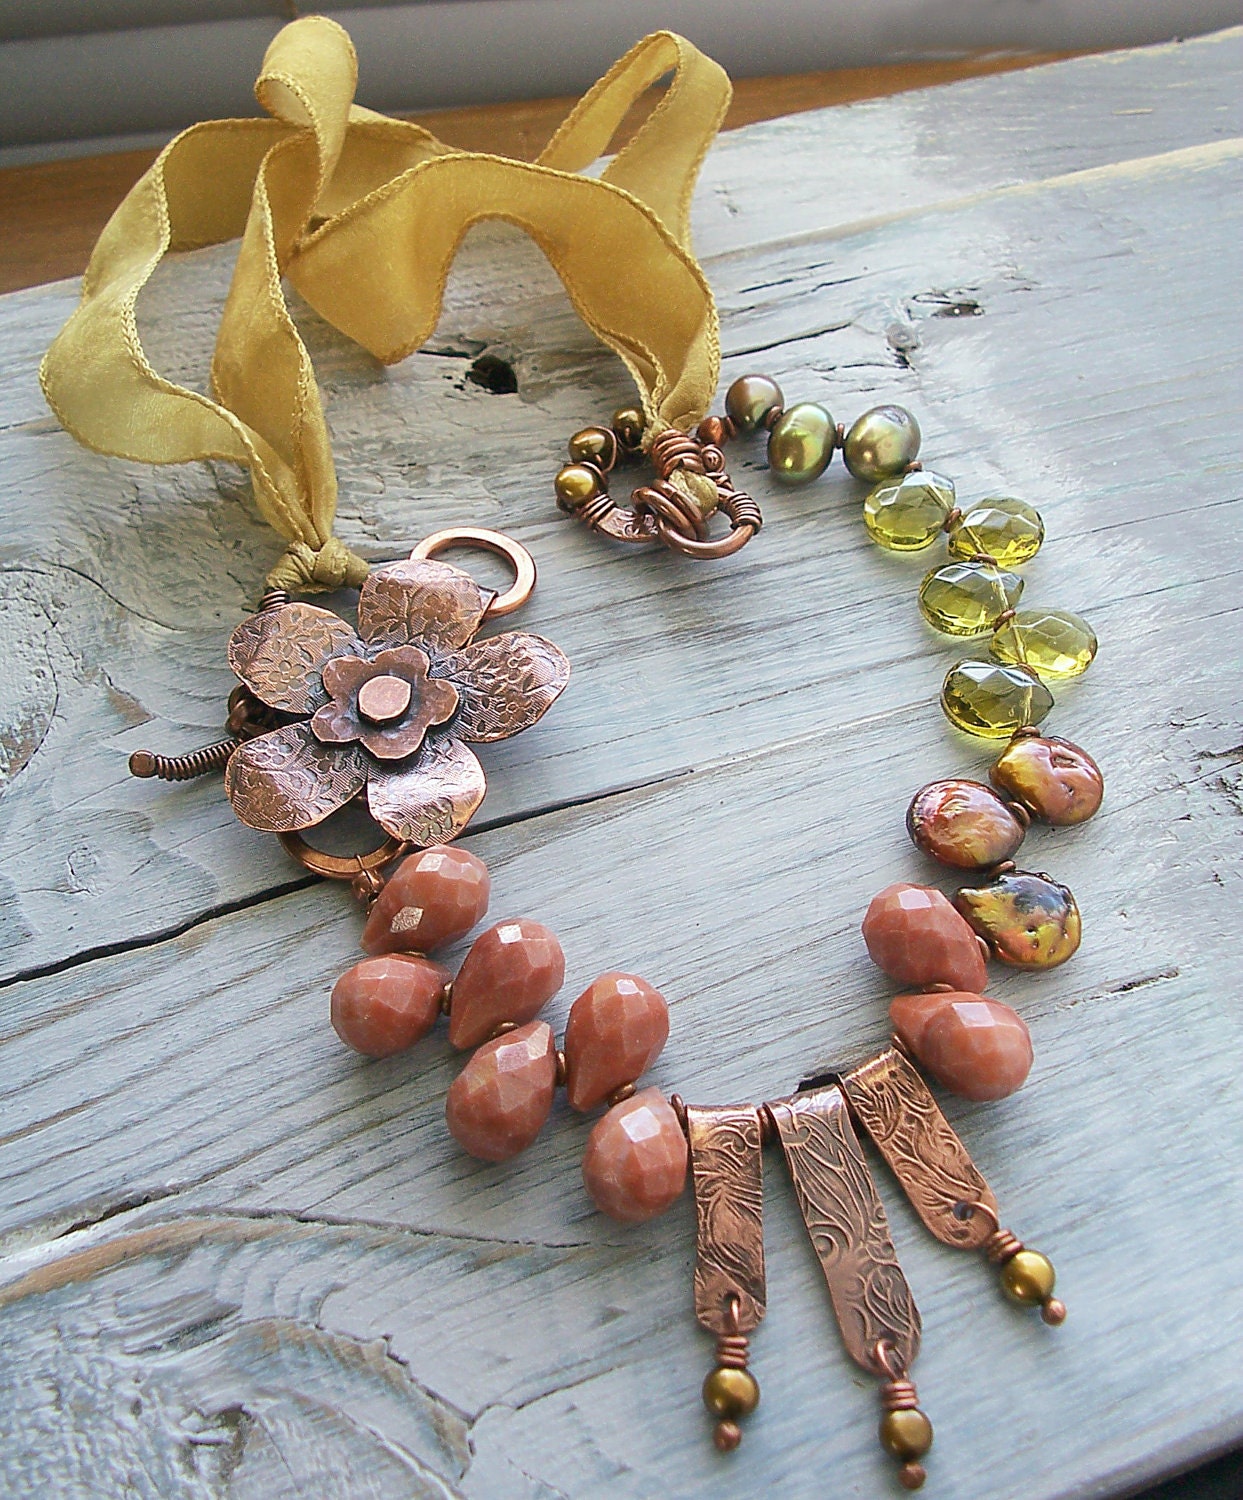
For months I would take this rather wildly hued impression jasper pendant out, fiddle with it, work up some goofy bail, take it apart because it was lame, and put it away again. Rinse and repeat! Finally I hit on something I actually liked, and then started sort of adding to it, tweaking this, tweaking that. Took me a whole day (off and on) to decide how to hang it. Chain? Leather? Ribbon? What color? Berry or brown? Other? I had a sneaking suspicion more sections of wrapped copper were the answer but I didn't want to make them (hammering, bending, wrapping, antiquing, tumbling, sealing...bah!) Eventually my compulsivity won out and that's what I did. And of course I couldn't resist adding a few gewgaws (the little fuchsia pearls) to the textured washers (I used a South African coin with a nice crest design to texture the washers).

This is what it's like on:

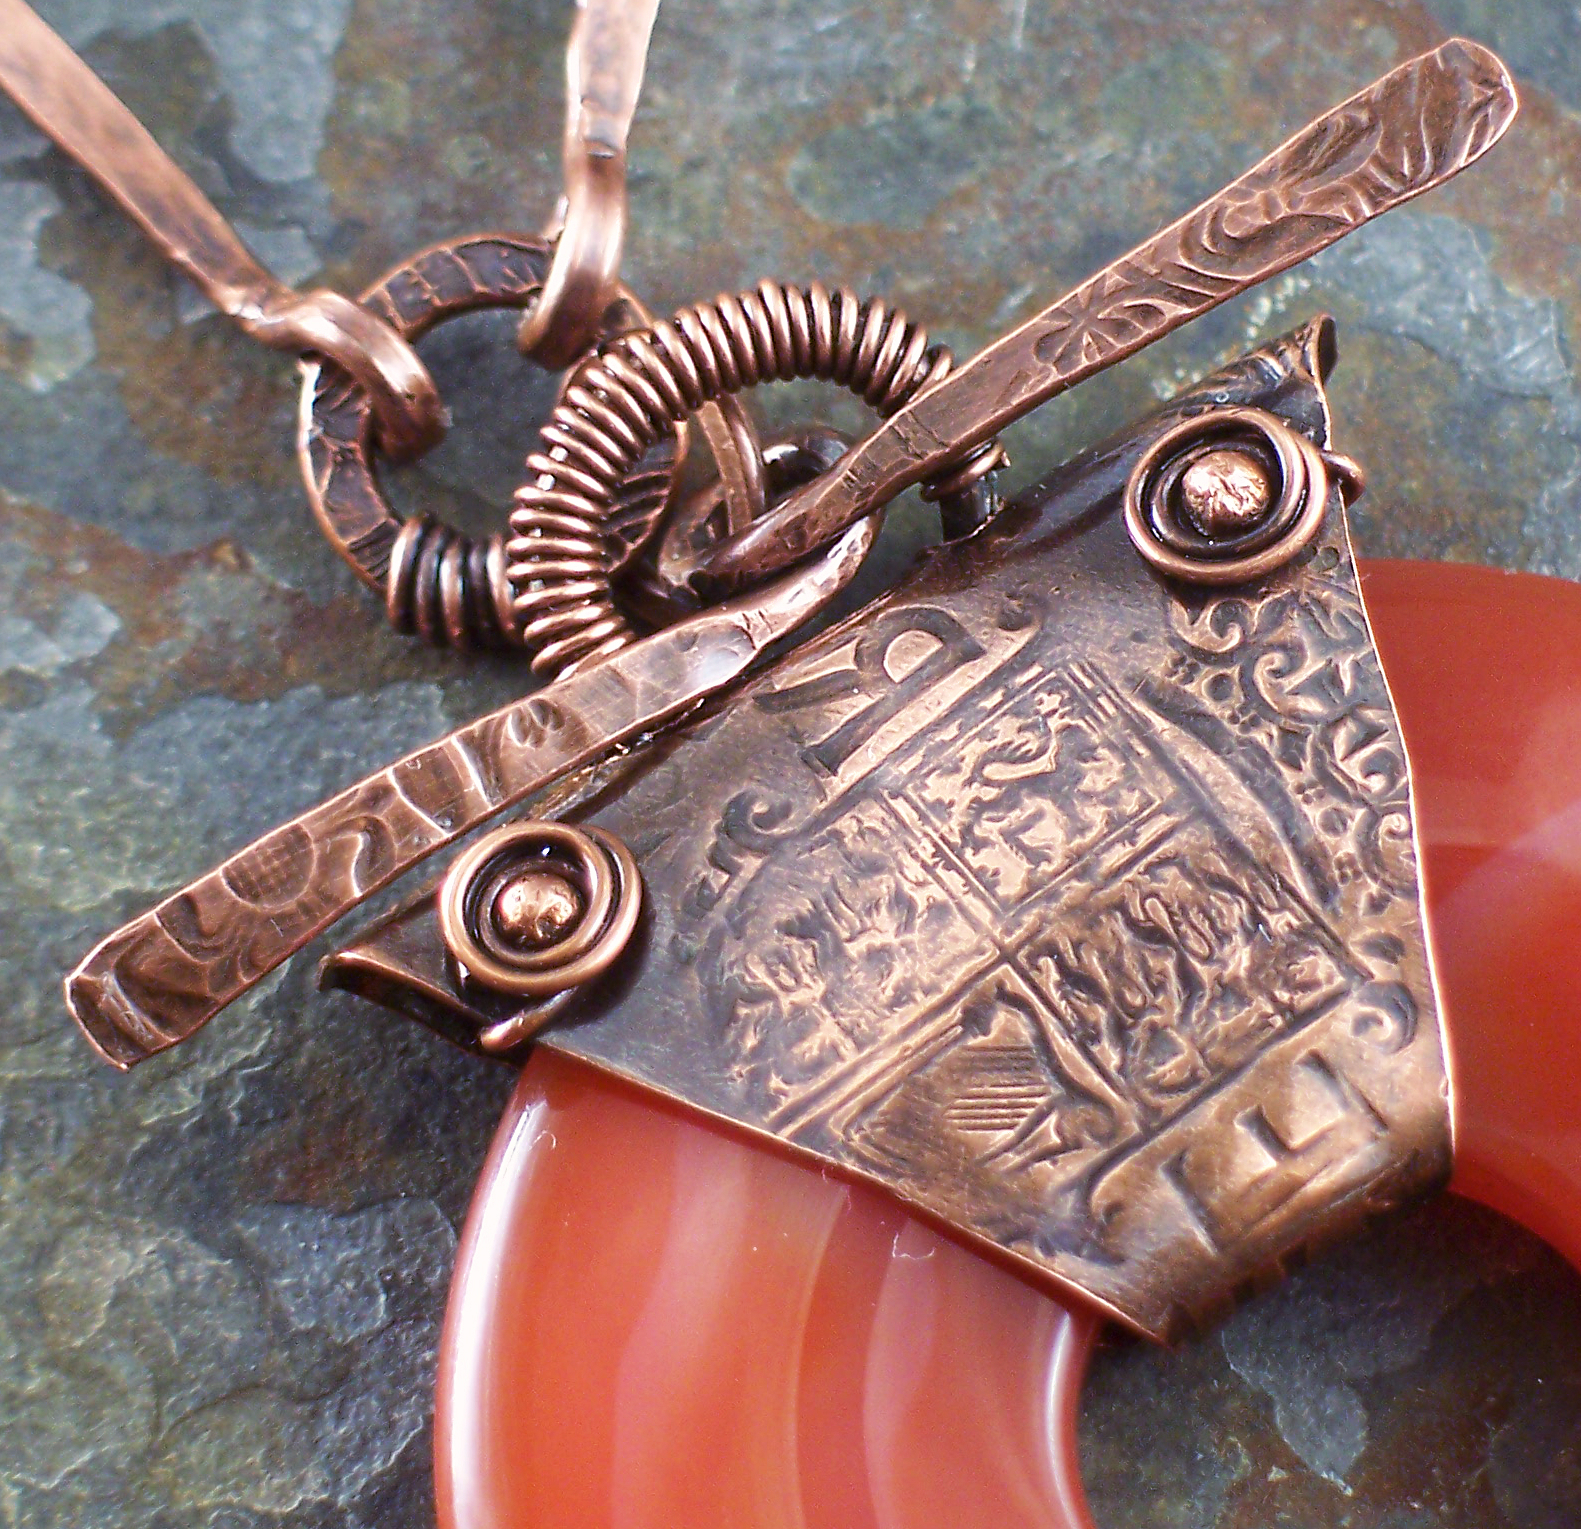
This one below sat around forever (like since mid-April) with just the main portion on it. I textured it with one of my favorite coins--a 1959 British half crown.

I didn't like the hanging tube I had on it (it was kind of crooked) so I took the tube off and messed with the loop, and kept messing with it until it was functional. Unfortunately by the time it became functional, it was no longer presentable...so I wrapped it with wire (is it ugly? wrap it!!!). I added a couple headpin rosettes because it seemed a little blah the way it was. I also toyed with the idea of making it part of a toggle clasp but I really wanted the length to be easier to adjust. The toggle bar idea stayed with me though....what about a permanent toggle bar, I thought? A big ass one that won't come out, that will just be part of the bail. The idea was kind of exciting so I made one and put it on there, and it seemed to echo the Asian sensibility of the rest of the metal so I built on that. It reminds me a little of dragonfly wings.


I recently bought a pound of coins from Joel Anderson Interesting World Coins and Paper Money (there were some really great ones in there!!) and there were a handful in there that were too worn down to use for textures, and so blackened from age and handling that you couldn't even see what kind of coin it was. So I tried treating them with verdigris patina solution from MissFickleMedia. They came out with some great colors and shading on them! (Way easier than trying to punch discs out of 16 gauge metal sheet). On a couple I decided to add some Ranger opaque patina inks too from Melinda Orr, to bump up the color saturation. I thought one of them might look nice with this red agate so I rigged up something to hang one with (plus my second ever tube rivet--the tubing from Melinda Orr is perfect for this! I didn't have my punch set from Harbor Freight yet so I used one of my tiny doming punches to flare the tube before I tapped it flat. Worked fine. In fact I probably don't even need the punch set now. Which of course arrived today).

I thought maybe a couple bars to echo the donut bail I used for the turquoise-colored coin would be cool so that came next, with some turquoise lampwork spacers by Meital.  After trying like a gazillion different things for the rest of the necklace (beads? ribbon? sari silk? this leather? that leather?) I decided on buttery soft round leather cord in a natural brown from LeatherCordUSA. I slid some of my hand-forged copper tubes on there and squeezed them a little to keep them in place. And then I just had to dangle a little carved carnelian oval off the clasp loop.
Beijing and Sedona Meet
It's really long, about 29"--this seemed right for the size and length of the focal portion.

Finally, is a rectangle of pale sea green impression jasper (I love that stone, obviously!). I had made the fold-over portion without really thinking about how it would work but I loved the way it looked on there so much I was determined to figure out a way to use it. I eventually settled on this:
Asian Rustic
For some unexplained reason I made the curved metal hanging bar enormous, and it just seemed to dwarf everything I tried to hang it on. I thought maybe a crescent-shaped piece of metal sheet would have the right proportions. (It's funny how certain design ideas come about because you screwed up some other part of the design--"Hmm, how can I make this work so I don't have to do that whole thing over again?") I originally thought of wrapping the crescent with wire and trying some patina on it but I chickened out and textured it instead with my favorite 1963 British two shilling coin and brass texture sheets. I cut a little groove in the center with my Dremel cutting disc (WOW, was that slick! definitely going to be using that again) for the loop to sit down in, and then I put a little hammered bar over the top so it wouldn't come out. I like what that little bar added! I curled the ends of the crescent over to hold some connector rings. The boyfriend said leather, and I tended to agree, so leather it was!

On my model, who has seen better days (time to repaint her):

Stay tuned for some interesting things with more beat-up old coins...